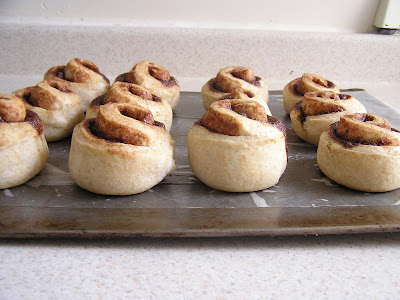
When Inez came out to Denmark, we discovered that in every single bakery there is this wonderful (cheap) amazingly light , subtly spiced pastry called teboller or tea buns. They are lighter than normal buns here and the taste has just the slightest hint of spice that makes it nearly indescribable. They would come plain, or with dried currants, or sometimes with small chocolate chips.
In the quest for the perfect teboller recipe, I tried a few different recipes and the one I had the best luck with was a recipe for Norwegian rosinboller (raisin buns) translated from Norwegian in The Transplanted Baker. The first step is boiling the dried currants in port, sherry or apple juice. I chose apple juice, however, rescuing some currants from the aftermath of glögg making probably wouldn't be a half bad idea.
The recipe calls for adding the wet indgredients to the dry ones, but I'm faily set in my ways and found that adding the flour/currant mixture slowly to the wet ingredients worked just fine.
I've had yeast trouble in the past, so this time I made sure to proof the dough. All was well and rising went prefectly.
It took three different batches (one with a different recipe, and one with a typo in the translation, and the one linked to above, typo free) before I came out with this result. And while I think I may have waited too long, and can't, for the life of me, tell whether this recipe is even close to what I had in Denmark, it is absolutely wonderful. One think I know is different though, is that the cardomom is much more noticable in these buns than how I remembered. For a more subtle bun I woould try halving the amount of cardamom.
Saturday, December 26, 2009
Friday, December 25, 2009
[Elise] A Swedish Christmas
Normally, every year for Christmas Eve we drive down to Northfield, MN where we spend a lovely evening with my Dad's family. This year, however, it snowed. And snowed. And snowed. So we stayed home. This was my first Christmas Eve not spent in the presence of a room full of relatives, and while I was somewhat relived to put off the perpetual "So what are your plans for next year?" conversation, they are my family, and being stuck at home with no plans for holiday cheer, I wanted to do something special. So I orchestrated a nice Scandinavian dinner. Meatballs with mashed potatoes, gravy, lingonberry jam, and peas, while perhaps a very stereotypical Swedish meal (in fact because of the last minuteness of it all, the meatballs were frozen köttbullar from IKEA that we always seem to have on hand) it is a meal that I have seen some variation of in just about every Swedish restaurant I've ever been to. And who could blame them, the sweet and savory mixture of gravy and lingonberry complements the meat so nicely.
My Dad made the mashed potatoes, peas, and gravy. I got the honor of microwaving meatballs while my mom fixed salad, but where I really decided to make home feel like Christmas was with dessert: rice pudding and glögg. Rice pudding (risgrynsgröt) is super simple to make. For one cup of rice (preferably a stickier rice than the jasmine rice we had on hand) use one quart of whole milk and a little bit of salt. I made do with a quart of 1% and maybe a third of a cup of cream, and have also been told to use a small can of evaporated milk and the rest 1% (or skim or 2%) to fill out the quart. Also lots of recipes I've been finding call for 2-3 quarts of milk, without specifying the fat content. This recipe is most definitely not picky. You simmer (either in a double boiler or on the lowest possible heat (if you have it heated directly, watch it, without a double boiler I almost always have it boil over on me at least once) this all for about an hour (if you're using one quart of milk, longer for more) but I never time it, I always just stir occasionally and stop when it looks like delicious rice pudding.
While you can make rice pudding year round (in fact, I practically lived off it while I had mono in Denmark, because it was the easiest cheapest way to make something that was soothing to my throat) it is also a special Christmas dessert. One Danish girl I lived with made fun of me for making rice pudding when it wasn't Christmas (but then later a Danish guy moved in who made it every other week as a meal). What makes Chrismas rice pudding special is the addition of one whole almond. It's said that whoever get's the almond in their bowl get's luck for the coming New Year.
After it's done gooking and cooled off a bit you dish it out in small bowls and sprinkle cinnamon sugar on top and put a pad of butter.
When the rice pudding was about 10 minutes away from being done, I started making the glögg. Glögg is a traditional Swedish holiday drink, made by mixing burgundy wine and brandy (because we only had 3 people drinking it, we did 325 mL of each, however normally you would do a whole bottle of each) You simmer this (uncovered, or else it lights itself on fire when you take the lid off, as I found out!) for about five minutes with a cup of blanched whole almonds and a half a cup of dried currants (or raisins if you don't have currants) and spoonful of mulling spices (whole cloves, some candied orange peel, a cinnamon stick, etc.) plus 10 or so cardamom seeds (not normally included in mulling spice mixes).
Next comes the fun part. Get a second pot or serving container, and put a strainer over it. Put up to a half a pound of sugar cubes in the strainer (for the full recipe, 1/4 lb. for the half recipe). Light the whole thing on fire, and pour it slowly over the sugar cubes. Serve and enjoy! If it doesn't burn for very long the whole thing comes out pretty potent, and goes down nice and warm.
Tuesday, November 17, 2009
[Inez] Scones, always and forever
Saturday, October 31, 2009
[Elise] _______ Bread
So, today I didn't have enough time to get to the grocery store, nor have I gotten my sister's zucchini bread recipe yet, so for my _____ bread, in the Halloween spirt, I made pumpkin bread. I found a simple recipe that worked with my sparse pantry. Instead of walnuts, like the recipe suggested, I used 3/4 c dried currants. The recipe also called for 3 small (3x7") loaf pans, so I used one 10" circular pan.
(Instead of grocery shopping, I explored an abandoned cemetery in the woods with some friends)
Because it was big and round, it was just begging to be frosted with cream cheese frosting. I whipped some up with a recipe from the Joy of Cooking, which went just perfectly.
Because the recipe only called for cinnamon and nutmeg, the currants and frosting added just enough to make the bread interesting. Perfect to curl up with to watch The Night of The Living Dead with.
Happy Halloween!
Tuesday, October 27, 2009
[Inez] ______ bread
Remember how we said we were going to make the same thing from our respective kitchens once a month? This month it's _____ bread. I made banana bread, and Elise is going to make zucchini bread. I'm sorry to say that the pictures aren't very beautiful because it gets dark so freaking early, but I assure you, it is delicious.
My favorite banana bread recipe -- in fact, the only banana bread recipe I use since discovering it -- is from Sundays at Moosewood. Of course, it includes the essentials to any good food item, butter and sugar.
But what I really like about it is that it calls for lime and ginger. Just a little bit, just enough to add a little complexity to the flavor.
I also usually add chocolate chips because really, what can't be improved upon by adding just a little bit of chocolate? The key though is to add just a little bit of chocolate. Too many chips and you lose the banana flavor.
Remember when we made beans and I told you to add more salt than you thought you should add? Okay, well when making banana bread, add fewer chocolate chips than you think you should add. It will make for a more well-balanced deliciousness.
Preheat oven to 350F. Butter a loaf pan.
- 3/4 c brown sugar
- 1/2 c butter, soft
- 2 eggs, beaten
- 1 cup mashed bananas (3 bananas)
- 3 T milk or yogurt
- 1 T lime juice
- 1/2 t salt
- 1/2 t ground ginger
- 2 c flour
- 1 t baking powder
- (chocolate chips)
Cream butter and sugar in a large bowl. Stir in eggs, bananas, milk/yogurt, and lime juice. Add salt and ginger and mix well.
Sift flour and baking powder together in separate bowl. Add the dry ingredients to the wet ingredients and mix until smooth. Pour batter into pan and bake for one hour, or until a toothpick comes out clean.
Note: the recipe calls for coconut (no thank you) and also includes a rum-lime-sugar glaze (unnecessary). I, obviously, have opted not to include these elements. (/edit)
Oh yeah, and also I went to a thrift store (Georgia Thrift, for those of you who know DC) and I found some awesome deals on sweaters. I'm particularly excited about this one:
I know it looks like junk but it's actually merino wool and angora and cashmere! Triple score!
Saturday, October 3, 2009
Monday, September 21, 2009
[Elise] Sweet Potato Lasagna
I love lasagna, but have never really been a big fan of the ricotta cheese and meat sauce variety. Instead, over the past semester I've been working on my own recipe for awhile now. The carrot bit I got from my Danish neighbors, and the sweet potato is partially inspired by a piece of lasagna I had at a restaurant in Ithaca. Though it could certainly use some tweaking, I'm satisfied enough to share my recipe for a delicious vegetable packed lasagna.
Ingredients (measurements approximate)
16 lasagna noodles
1 sweet potato
1 zucchini
1 red onion
3 cloves of garlic
1 carrot
1 cup of frozen corn
2 cups of tomato sauce
1.5 cups of mozzarella
1.5 cups of mild white cheddar
I started by boiling the noodles in a large pot.
While waiting for the water to boil I peeled and chopped up one sweet potato, into inch square pieces. These I boiled in a separate pot until soft, drained, and then mashed, and set aside.
While those two were going on I sauteed some veggies. I used one onion, one zucchini and 3 cloves of garlic, but really this should be whatever you are really craving to have in your lasagna.
All of this at once isn't as crazy as it seems. The big pot takes a long time to boil, the small one less time, and the sauteing is only about 5 minutes. It's sort of like a nesting doll of cooking tasks, which all works out fine as long as you keep an eye on everything.
Next comes the layering. The start of this is a good time to preheat the oven to 375F
I started by spraying the 9x13" pan with oil, then laying down four noodles, overlapping. The first layer is just the mashed sweet potato, spread out as evenly as possible. Then four more noodles. The next layer is the sauteed veggies. First I spread about a third of the sauce down, then I sprinkled on the veggies, and then about 2/3 of the mild white cheddar shredded. Four more noodles. Then another third of the sauce. Then I sprinkled the shredded carrot over the whole thing, followed by the cup of frozen corn, and then slices of mozzarella. Four more noodles. Then finally the rest of the sauce, a ton of oregano, and the rest of the cheese (this time with mozzarella shredded).
Baked for 30 minutes, covered with tinfoil, and another 10 without, the lasagna came out perfectly. Though, I would recommend a few toothpicks in the middle to keep the tinfoil off the cheese.
Sunday, September 20, 2009
[Inez] Cinnamon rolls
I made cinnamon rolls too! Like Elise, mine was highly experimental. I made a basic bread recipe ( sort of followed a recipe from Laurel's Kitchen that involved scalded milk, but I veered somewhat) and then put cinnamon/sugar/butter/[raisins] and baked it. I made them in 2 batches because I had SO MUCH DOUGH, so I ended up using 2 different methods. I'll discuss.
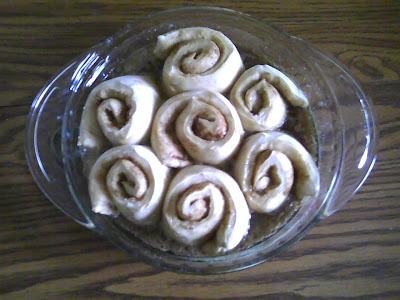
Then I rolled it into a log, cut it into discs, put it in a pan, let it rise again, and then baked it. While it was baking I went online to read about cinnamon buns, and some peope recommended spreading butter on top, so I did that when they came out of the oven. For the first batch, I kneaded the dough a bit after the first rise, concerned about big air bubbles. After rolling it out I slathered on melted butter and sprinkled a whole bunch of cinnamon sugar.
With the second batch, I didn't knead at all after the first rise. I just punched it down, smushed it a bit, and then rolled it out. Then I tried mixing cinnamon sugar with butter to make a goopy mess, which I slathered (thickly) on the dough.
Also I put melted butter on top of the rolls after the second rise, before baking them. I think this helped keep them nice and soft, not at all crispy on the outside.
The second batch got much taller than the first batch, and had a nicer texture, so I think not kneading after the first rise is definitely the way to go. Also, I prefered the butter mixed with the cinnamon and sugar because I was able to to put a lot more on, which made them good and cinnamon-ey, just the way I like it!
[Elise] Cinnamon Rolls
To bring more togetherness to the blog, Inez and I decided that once a month we would each make the same thing and each post about it. Our inaugural month's sweet: Cinnamon Rolls.
Sunday night and Monday morning, I had semi-successful, highly improvised, cinnamon roll experience.
I began by making the dough according to my Grandma's recipe. She makes excellent sticky buns, so this seemed a good place to start. From here the improvisation began. The recipe called for letting the dough rise over night, the rolling out the dough, coating it in cinnamon, sugar, and butter, rolling it up, and slicing it into discs, then placing it in a sugary, syrupy pan, and letting it rise another two hours, then baking it for 25 minutes
Not having 3 hour mornings on Modays, I waited about 4 hours Sunday night, before rolling out the dough. This made 7 rolls instead of the 15 the recipe called for, which actually worked out great because I only had a pie pan and no 9x13" pans.
The next morning I baked at 375F for the requisite 25 minutes and took it out.
After taking one out and eating it, it was delicious, warm, gooey...dough. So I went to class and came back a few hours later, put the rolls in the over for another 20 minutes, and voilà!
All in all, they were reasonable. The cooling time in the middle of the baking affected the texture some, and the dough was denser than I would have liked. However, while they may not have turned out quite the way I wanted them to, seeing what changed as I tweaked the recipe was very helpful in understanding the baking process better.
(and, alas, while my digital camera is being repaired, I only have the camera on my phone.)
Friday, August 28, 2009
[Inez] Plum cake
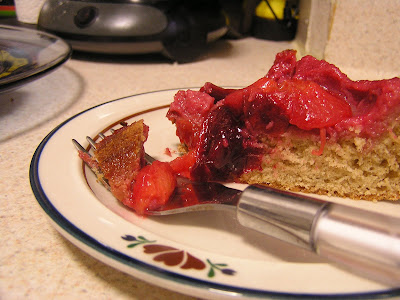
Jamie bought me a bag of plums when she was here, which of course I forgot about. So I made plum cake in the interest of not letting them go to waste. We all know cake will never go to waste in my house.
It's Ruby's recipe -- that is to say, it's the Joy of Cooking's spice cake, with a twist that Ruby thought up.
I seem to have lost some kitchen items in the move. Namely: measuring cup, measuring spoons, whisks, spring form pan, 6-muffin tin.... You know, the things I pretty much use the most. Luckily I didn't lose this silicone cake pan (can you really call it a pan if it's silicone?) so I used it for the cake.
So anyway, this was my dinner.
[Inez] Gallo Pinto
This is gallo pinto as I learned to make it in Ticolandia (more commonly known as Costa Rica). I know that they make gallo pinto up in Nicaragua, too, but they don't put in all the goodies you find in gallo pinto a la Tico.
There are 4 ingredients which are key to many tico dishes, but especially gallo pinto: onions, garlic, cilantro, and salt. Especially salt. Always add more salt than you think you should.
Gallo pinto is essentially rice and beans. It is the absolute staple of Costa Rican diet, and because I'm in DC now and don't have extra money, I anticipate it becoming a staple of my diet as well.
- Dried beans, soaked overnight
- onions
- garlic
- salt
- cilantro
- patience
How many onions you use depends on how much beans your working with. I used 1 1/2 cups dry beans and 1 medium onion. It's a matter of preference.
* Tip on chopping onions: Cut the ends off, then cut them in half from end to end. Then, using a sharp choppy knife, cut them from end to ALMOST end. Don't cut quite all the way. (See below)
This will make your life a lot easier. I cut both my garlic and my onions pretty coarsely for the beans. More garlic is better -- I think I added somewhere around 3-5 cloves.
Now, cook the beans. Bring them to a boil on high, then reduce the heat to pretty much as low as it goes and simmer covered for a long, long time. Upwards of an hour. Stir them from time to time and be sure to taste them to make sure there's enough salt. You should probably add more.
This will make your life a lot easier. I cut both my garlic and my onions pretty coarsely for the beans. More garlic is better -- I think I added somewhere around 3-5 cloves.
Sautee the onions and garlic in a little vegetable oil with salt. More salt than you think you need. Then add the beans and a whole bunch of water. If you want, add some cilantro. I do whenever I have it, and while I'm not sure if it makes a huge difference, it makes me feel better to put it in.
Now, cook the beans. Bring them to a boil on high, then reduce the heat to pretty much as low as it goes and simmer covered for a long, long time. Upwards of an hour. Stir them from time to time and be sure to taste them to make sure there's enough salt. You should probably add more.
Ultimately, the beans should be soft and flavorful, and look like this:
Notice how some of them are cracked open? That's a good sign.
The rice.
- rice
- water
- onion
- cilantro
- salt
- (garlic)
There is always the question of whether or not to rinse the rice. I do when I remember to -- about half the time.
Let me explain to you about Costa Rican rice. First of all, use a medium grain rice. Basmati is too long, but will do in a pinch. Please, however, do not use short grain or sticky rice! This rice should end up on the dry side -- that's not to say it should be undercooked, but it also shouldn't have any excess moisture and certainly no stickiness.
Chop onion finely, and if you prefer, garlic as well (also finely chopped). Sautee them briefly in vegetable oil and salt. Add the dry rice and sautee it with the onions for a little while.
Meanwhile, deal with your cilantro. Some people fuss over cilantro, but I do not. I hold each end of a small bunch in one hand and twist, so that the roots and stalk can be discarded. Rinse thoroughly. Then chop it up.
Add water and cilantro to the rice. For white rice, it should be 1:1 or only very slightly more water. I used 2 cups dry rice and 2 1/3 cups water, and that was too much -- my rice was a bit sticky in the end.
Bring it to a boil on medium-high, stirring occasionally. Once it has begun to boil (watch it! don't forget about it!), put the lid on, turn the heat down as far as it goes, and set a timer for 20 minutes. (Note that this time is for white rice only.)
The gallo pinto.
- onion
- garlic
- beans
- rice
- cilantro
- Salsa Lizano
- optional: scrambled egg, red pepper
Chop your onion and garlic and sautee it on a medium heat. When the onion has started to become translucent and smells really, really good, add the beans. You should drain most of the bean juice when you add them, but not all of it. (If you find you have too much juice, cook it a bit longer to let some of it evaporate.) Cook the beans uncovered on medium heat.
When the bean juice is bubbling, add the rice. I go somewhere between 2:1 and 3:2 rice:beans, but again, a matter of preference. Stir thoroughly so that the rice becomes coated in bean juice and turns sort of brown. While this cooks -- stir it occasionally, or the rice will stick to the pan -- rinse and chop more cilantro.
When the rice and beans are hot, turn off the heat and add the cilantro.
You also need to add Salsa Lizano for it to be true Tico gallo pinto. Salsa Lizano is a mild, salty sauce made in Costa Rica. If you don't have Salsa Lizano, add even more salt to the rice and the beans. Salsa Lizano really brings all the flavors together and turns a good, hearty, filling dish into a delicious, mouthwatering, hearty, filling dish.
Subscribe to:
Posts (Atom)